Introduction
In the modern world of software development, Application Programming Interfaces (APIs) have become the backbone of digital communication between different systems and services. Among the various architectural styles for designing APIs, REST (Representational State Transfer) has emerged as the dominant approach due to its simplicity, scalability, and stateless nature. REST APIs enable different software applications to communicate over the internet using standard HTTP protocols, making them platform-independent and widely accessible.
However, designing, documenting, and implementing REST APIs can be a complex and time-consuming process, especially when ensuring consistency, proper documentation, and ease of use for both service providers and consumers. This is where Visual Paradigm comes into play—a powerful modeling tool that streamlines the entire REST API lifecycle from design to deployment.
This comprehensive case study explores how Visual Paradigm facilitates the complete REST API development process, covering everything from initial design using UML class diagrams to generating production-ready code and comprehensive API documentation. We will walk through both the provider’s perspective (designing and implementing the API) and the consumer’s perspective (accessing and utilizing the API), providing practical insights into each step of the process.
Understanding REST API Fundamentals
What is REST API?
The word REST stands for REpresentational State Transfer. It is an architectural style used when designing networked applications. Web service APIs that conform to the REST architectural constraints are known as RESTful, or REST API.
REST APIs operate on resources, which are identified by Uniform Resource Identifiers (URIs). These resources are manipulated using standard HTTP methods such as GET, POST, PUT, PATCH, and DELETE. The key principles of REST include:
-
Statelessness: Each request from a client contains all the information needed to process it
-
Client-Server Separation: The client and server operate independently
-
Cacheability: Responses must explicitly indicate whether they are cacheable
-
Uniform Interface: Standard methods for manipulating resources
How Visual Paradigm Supports REST API
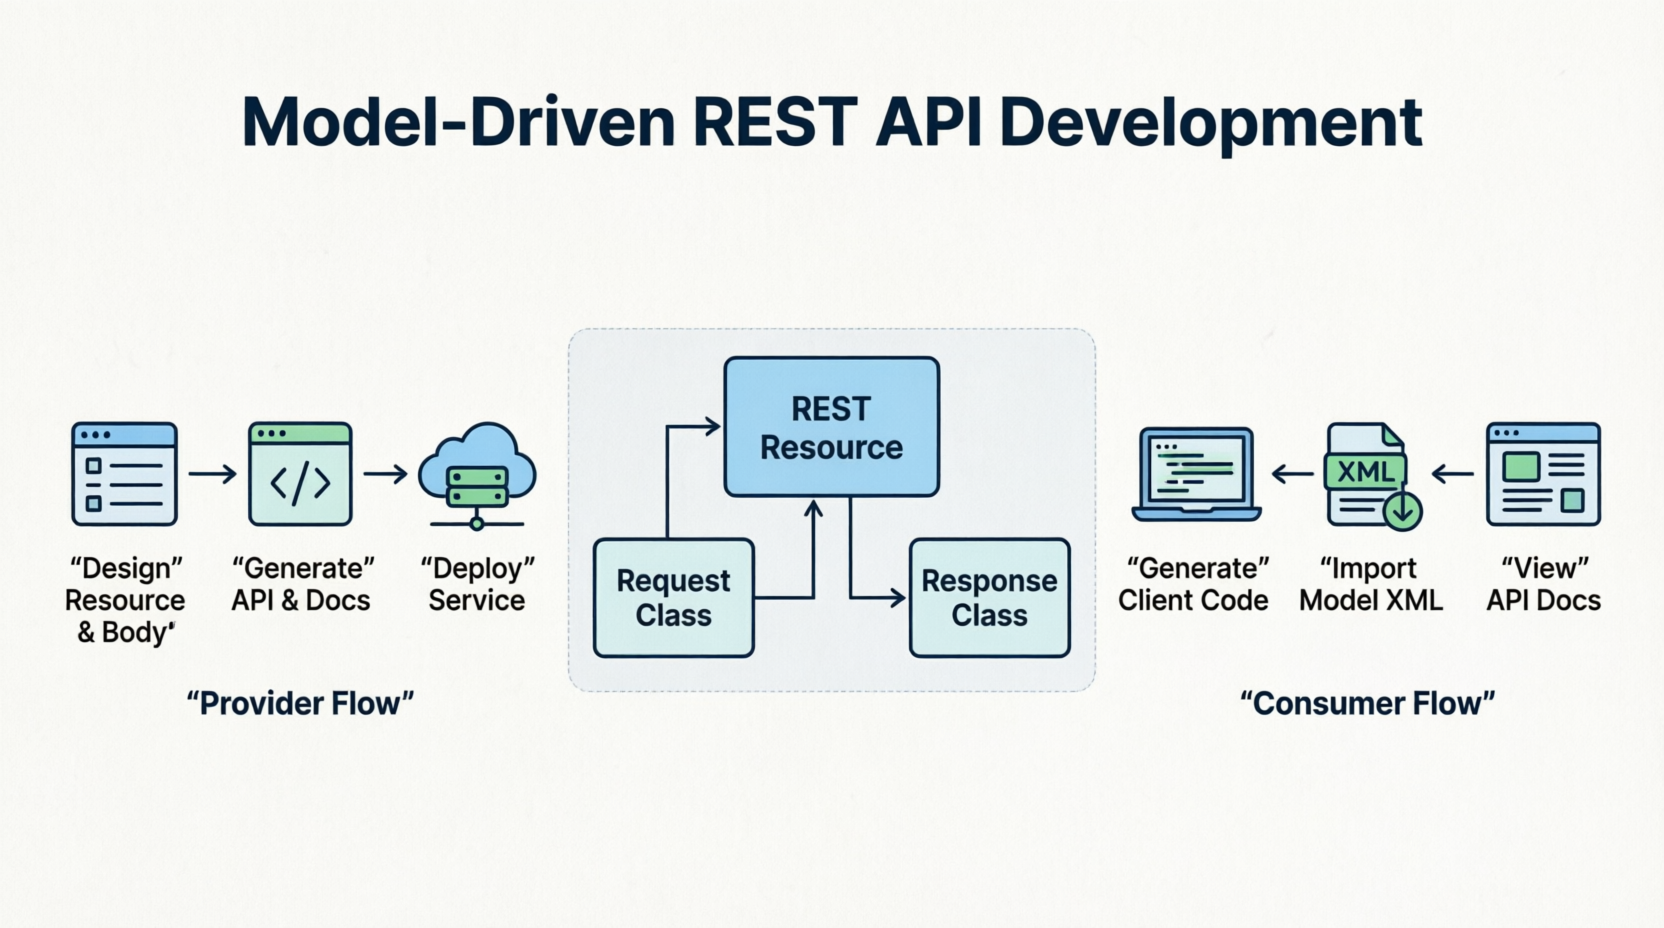
Visual Paradigm supports modeling the underlying communication model of REST API, as well as the generation of REST API and API documentation. The platform provides a visual approach to designing RESTful services, making it easier to conceptualize, document, and implement APIs.
The following Activity Diagram shows you the steps that a provider will take in order to produce the REST API and related API documentation:

Activity Diagram – How can a provider design and produce the REST API?
First of all, the service provider will design the communication model with a class diagram that visualizes the REST service, the request and response body. He can then generate the REST API and API documentation from the class diagram. After that, the provider can continue with programming the service logic. When finished, he can deploy the service and publish the API on their website.
The following Activity Diagram shows you the steps that a consumer will take in order to use the service:

Activity Diagram – How can a client access a service with REST API?
Consumer of service can visit the API documentation page, download an XML file and then import the XML file into Visual Paradigm. By doing so, they can then generate the source code and the API required in accessing the service. The final step would be to program the application that uses the service with the generated source code.
Part 1: Designing REST API with UML
How to Design REST API with UML?
You can design your REST API by drawing a class diagram that represents your resource, the request and response body.
Drawing REST Resource
A REST resource is the fundamental unit of a web service that conforms to REST. It is an object with a URI, the http request method, associated parameters and the request/response body. Each of the REST resources represents a specific service available on the path specified by its URI property. Therefore, if you want to model multiple services, please draw multiple REST resources.
Step-by-Step Guide to Drawing a REST Resource
Step 1: Create a New Class Diagram
Select Diagram > New from the application toolbar. In the New Diagram window, select Class Diagram and then click Next. Enter the diagram name and description and then click OK.
Step 2: Select REST Resource Tool
Select REST Resource in the diagram toolbar.
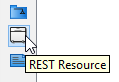
Select REST Resource in diagram toolbar
Step 3: Create REST Resource
Click on the diagram to create a REST Resource. Name the resource by giving it a short and meaningful name.
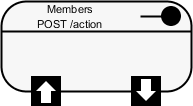
REST Resource created
Step 4: Open Resource Specification
Right-click on the REST Resource and select Open Specification… from the popup menu.
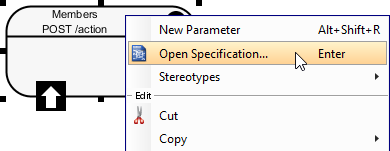
Opening the specification of REST Resource
Step 5: Fill in General Properties
In the General tab, fill in the following:
| Property | Description |
|---|---|
| URI | Each REST Resource has its own URI. Consumers access to URL to access for the REST Resource. Typically, a RESTful URI should refer to a resource that is a thing instead of referring to an action. Therefore, when you are deciding the URI, try to use a noun instead of a verb. |
| Method | Specifies the action to act on the resource. For details, please read the section Methods (HTTP methods) below. |
| Description | Description of resource that will appear in generated API documentation. It is recommended to provide clear description of the service, so that the consumer know what the service is and how to operate with it. |
General properties of a REST Resource
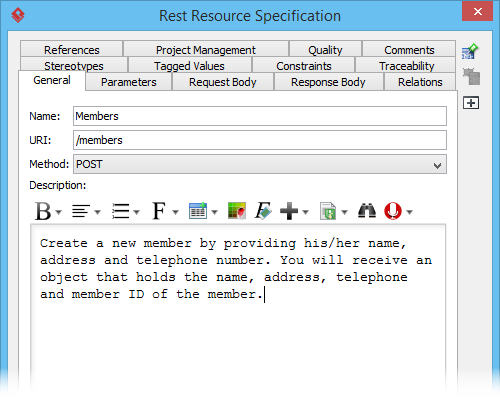
URI, method and description filled
Step 6: Model Request Body (for POST, PUT, PATCH, DELETE)
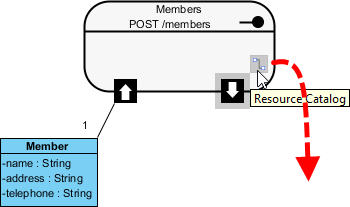
If the REST Resource uses a POST, PUT, PATCH or DELETE method and if parameter is required in using the REST Resource, model the parameters by drawing class(es). Move your mouse pointer over the REST Request Body icon. Press on the Resource Catalog button and drag it out.
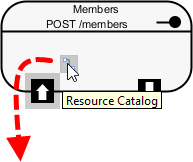
Create class from REST Request Body
Release the mouse button and select Association -> One Class from Resource Catalog.
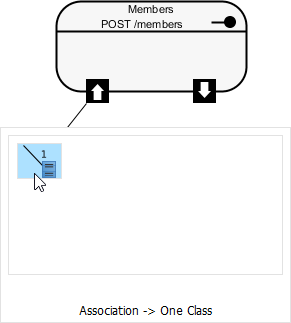
Select One Class
Release the mouse button to create the Request class. The class is named based on the REST Resource by default. You can rename it if you like. For instance, if you are going to create a member via the /members REST Resource, you probably need to send the member’s details to the server for creating a member record. Therefore, name the class Member for storing member’s details.
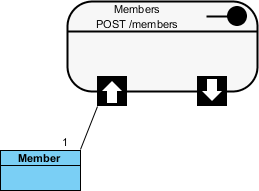
Class created from REST Request Body
Add the attributes into the classes. These attributes will hold the data that sends to the server.
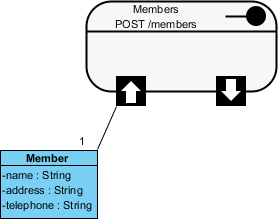
Attributes added
Here is a comparison between the class model and the representation of request body in JSON.
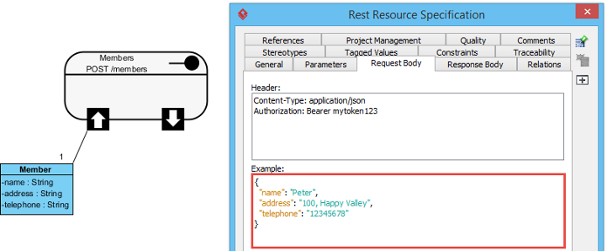
Comparison between class model and Request Body in JSON
Step 7: Model Response Body
Now, you can move on to designing the response part of the REST Resource. Move your mouse pointer over the REST Response Body icon. If the service will return a simple data value or object, press on the Resource Catalog button and drag it out. Then, select Association -> One Class from Resource Catalog. If the service will return an array of object, select Association -> Many Class from Resource Catalog.
Create class from REST Response Body
Name the class and add the attribute into the class.
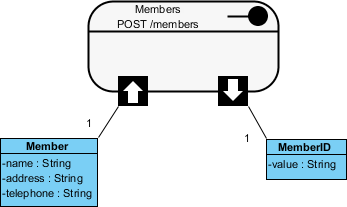
Class created from REST Response Body
Here is a comparison between the class model and the representation of response body in JSON.
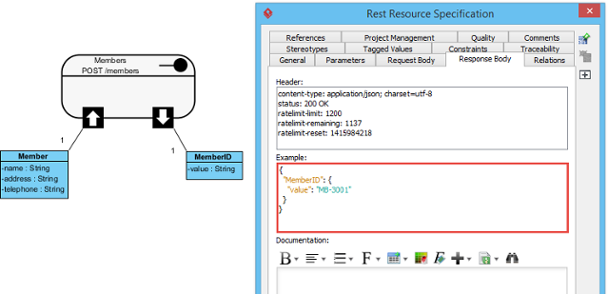
Comparison between class model and Response Body in JSON
Specifying Parameters for REST Resource that Uses GET
Parameters are referring to query parameters used for passing data to a service. For example, when you use a ‘currency converter’ service, you probably need to pass the amount to convert, the current currency and the target currency to the service, in return for the converted amount. The amount to convert, the current and target currency are therefore the parameters of service.
A feature of parameters is that they are optional. Another character of parameters is that they are non-unique, which means that you can add the same parameter multiple times.
Parameters are appended to the path of a URL when submitting a HTTP request. A URL with parameters could look like this: http://www.example.com?age-limit=18
To add parameters to a REST Resource:
-
Right-click on the REST Resource and select New Parameter from the popup menu.
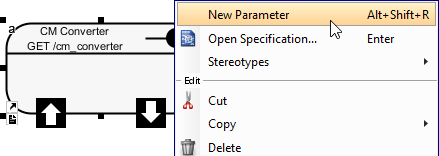
New parameter
-
Enter the name of the parameter. If you like, you can specify the type as well. Note that the specification of type is just for documentation purpose. While it helps the consumer to understand what kind of data is expected, it won’t have any effect in code level. In coding, parameters are always put into a Map that takes string as both key and value.
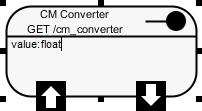
Parameter created
-
Press Enter.
-
Repeat step 2 and 3 to create all parameters. Press Esc when finished creating all parameters.
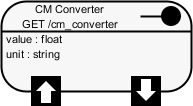
Parameters created
Modeling Multiple Scenarios
Sometimes, you may need to model multiple scenarios where there could be multiple or different Response Bodies. For example, you want to define the various HTTP status codes that can be returned as well as in some cases you may be returning an Error object embedded within the main response object.
Example:
Case 1:
-
Response Header: status : 200 OK
-
Response Body: {“customer” : {“name” : “Peter”}}
Case 2:
-
Response Header: status : 400 Bad Request
-
Response Body: {“customer”: {“error” : {“text” : “Invalid customer name.”}}}
To represent this, simply drag multiple Response Bodies from the REST Resource. When dragging the second Response Body, you will be prompted a status code. You can also set or change a status code by right-clicking on the association that connects the REST Resource and the Response Body and selecting Status Code… from the popup menu.
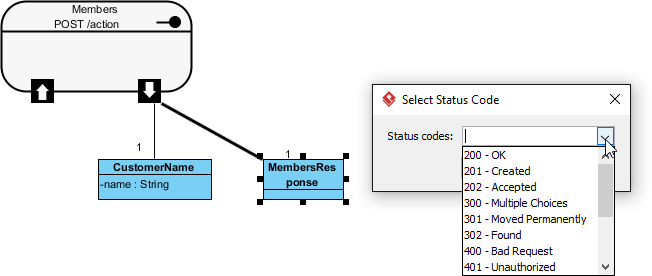
Creating the second Response Body
Part 2: Specifying Headers and Examples
Specifying the Request Header and Request Example
A HTTP message consists of a HTTP request line, a collection of header fields and an optional body. In order for consumers to access a REST Resource, you have to specify the request headers and request (body) example. By doing so, the request header and example will be presented in the generated API documentation. Consumer can then follow the specification in using the service.
-
Right-click on the REST Resource and select Open Specification… from the popup menu.
-
Open the Request Body tab.
-
Enter the Header. As we said in the Overview of REST API page that REST is not a standard but architectural style. REST makes use of HTTP standard, so, any REST call header is in fact HTTP header.
-
Enter the Example in JSON.
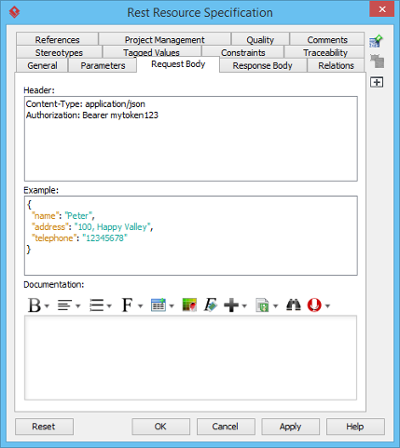
Request header and example specified
Specifying the Response Header and Response Example
Similarly, you need to specify the response headers and response (body) example. By doing so, the response header and example will be presented in the generated API documentation.
-
Right-click on the REST Resource and select Open Specification… from the popup menu.
-
Open the Response Body tab.
-
Enter the Header.
-
Enter the Example in JSON.

Response header and example specified
Headers (HTTP Headers)
HTTP headers are the core component of any HTTP requests and responses, and they define the operating parameters of any HTTP transactions. When you visit a URL in your web browser, your web browser sends an HTTP request and it may look like this:
GET / HTTP/1.1
Host: www.visual-paradigm.com
User-Agent: Mozilla/5.0 (Windows NT 6.3; WOW64; rv:33.0) Gecko/20100101 Firefox/33.0
Accept: text/html,application/xhtml+xml,application/xml;q=0.9,*/*;q=0.8
Accept-Language: en-US,en;q=0.5
Accept-Encoding: gzip, deflate
Cookie: landing=b7b93a316f374b13af4d5904c9797dcc; __utma=...
Connection: keep-alive
Pragma: no-cache
Cache-Control: no-cache
As we said earlier, REST is not a standard but architectural style. REST makes use of HTTP standard. Therefore, any REST call headers are in fact HTTP headers.
Methods (HTTP Methods)
HTTP methods, or sometimes known as HTTP verbs, specify the action to act on a resource. The most commonly used HTTP methods are GET, PUT, POST and DELETE, which correspond to read, update, create and delete operations, respectively.
| Method | Description |
|---|---|
| GET | A GET method (or GET request) is used to retrieve a representation of a resource. It should be used SOLELY for retrieving data and should not alter. |
| PUT | A PUT method (or PUT request) is used to update a resource. For instance, if you know that a blog post resides at http://www.example.com/blogs/123, you can update this specific post by using the PUT method to put a new resource representation of the post. |
| POST | A POST method (or POST request) is used to create a resource. For instance, when you want to add a new blog post but have no idea where to store it, you can use the POST method to post it to a URL and let the server decide the URL. |
| PATCH | A PATCH method (or PATCH request) is used to modify a resource. It contains the changes to the resource, instead of the complete resource. |
| DELETE | A DELETE method (or DELETE request) is used to delete a resource identified by a URI. |
Description of different HTTP methods
Part 3: Generating REST API from UML
Once you have finished the modeling of your REST Resource(s), you can generate the API and optionally, the API documentation.
Generating REST API (Provider Perspective)
To generate REST API:
-
Select Tools > Code > Generate REST API… from the toolbar.
-
In the REST API window, keep Provider selected for API Type. By doing so, you will be able to generate API documentation as well as the server sample code that guides you in programming your service (logic).
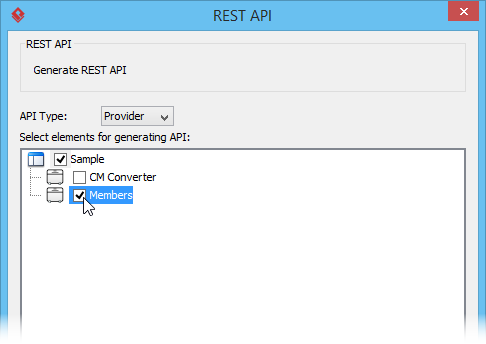
Select the REST Resource to be generated
-
Select the REST Resource to generate to code.
-
The generator will use the templates stored in the Template directory for code generation. You may edit the templates or select another directory as template directory.
-
Check Generate API Documentation to generate the HTML files that shows how to use the selected REST Resource(s). Supposedly, you will publish the generated API documentation in your website so that the consumers of your service can read through it to know how to access for your service.
-
Enter your company name, which will be presented in the API documentation.
-
Enter the base URL of your services.
-
Check Generate Sample to generate the source code that teaches you how to program your service. The sample code is rich and informative. Therefore, instead of programming from scratch, we strongly recommend you to generate the sample code and modify its content to fit your needs.
-
Enter the output path of the code.
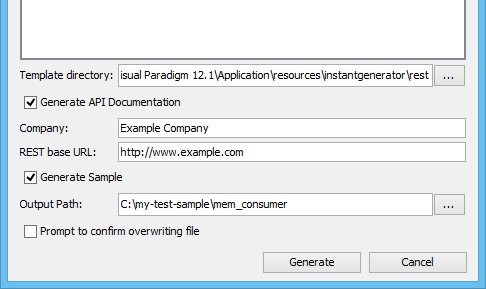
Output path entered
-
Click Generate. Depending on the option checked/unchecked, you may see the following folders in the output directory:
| Folder | Description |
|---|---|
| doc | The API documentation. You should publish the API documentation in your website, so that the consumers of your service can check the documentation to learn the API. |
| lib | In order for the generated code to work, the Google Gson library must be presented in your class path. Download library manually from https://code.google.com/p/google-gson/ and place the file in the lib folder. |
| sample_src | The sample code of client and servlet. It shows you how to access as client and how to react to a request as provider. We strongly recommend you to copy the code and modify it by filling in your own service logic. |
| src | The source code of the communication model. Do not modify the file content or else the code may not be able to function properly. |
Description of generated files
Part 4: How to Use the Generated REST API?
Consumers of RESTful service have to go through a series of steps in order to obtain the API code required for accessing a REST Resource.
Step-by-Step Guide for Consumers
Step 1: Visit the API Documentation
Visit the API documentation of the service published by service provider. The API documentation should look like this:
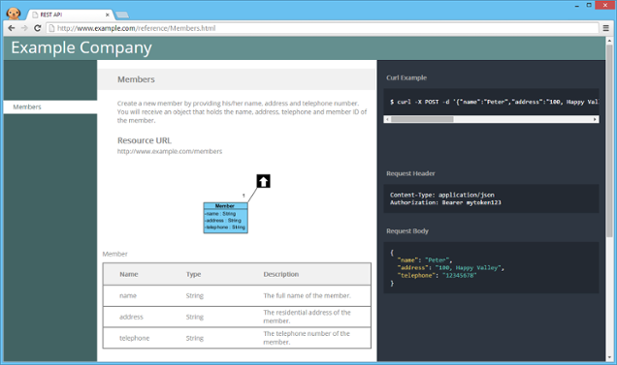
REST API documentation
Step 2: Download the REST API Model XML
You can learn the usage of the REST resource by reading through the API documentation. To obtain the API code, scroll down to the bottom of the API documentation. Click on the download link of the REST API model XML file at the bottom of the page.
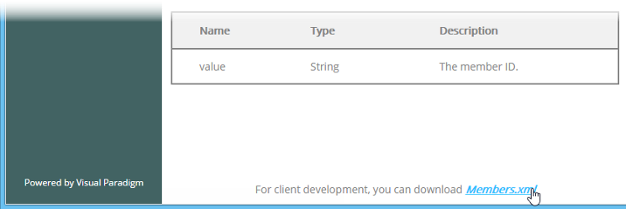
Download REST API model XML
Step 3: Download and Install Visual Paradigm
Download Visual Paradigm from the official website. Install and run it.
Step 4: Import the XML File
Import the REST API model XML file into Visual Paradigm by selecting Project > Import > XML… from the toolbar.
Step 5: Specify Import Settings
In the Import XML window, enter the file path of the XML file and click Import.
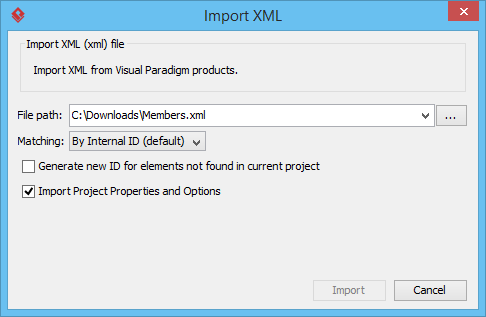
The Import XML window
Step 6: Open the Class Diagram
In the Diagrams tab of the Project Browser, double click on the class diagram created by importing the XML file.
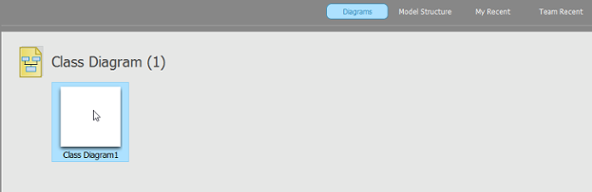
Open the class diagram
Step 7: Review the Communication Model
You can now see the communication model of the REST Resource which looks like this:

The communication model
Step 8: Generate the API Code
Select Tools > Code > Generate REST API… from the toolbar.
Step 9: Select Consumer as API Type
In the REST API window, select Consumer as API Type.
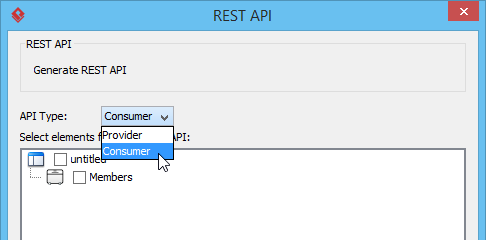
Select Consumer to be API Type
Step 10: Select REST Resource and Configure Generation
Select the REST Resource to generate code.
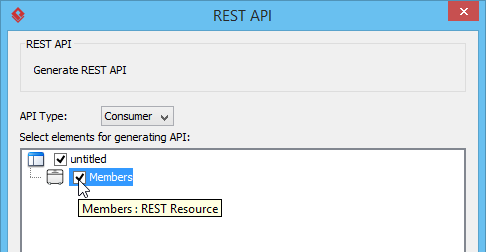
Select the REST Resource to be generated
Skip the Company field as you don’t really need it in programming. Enter the base URL of the service. Check Generate Sample to generate the source code that teaches you how to access the service. Enter the output path of the code.
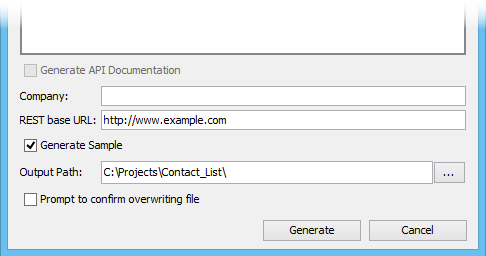
Output path entered
Step 11: Generate and Use the Code
Click Generate. Depending on the option checked/unchecked, you may see the following folders in the output directory:
| Folder | Description |
|---|---|
| lib | In order for the generated code to work, the Google Gson library must be presented in your class path. Download library manually from https://code.google.com/p/google-gson/ and place the file in the lib folder. |
| sample_src | The sample code that shows you how to access the service. We strongly recommend you copy the code and modify it by filling in your own application logic. |
| src | The source code of the communication model. Do not modify the file content or else the code may not function properly. |
Description of generated files
Conclusion
Visual Paradigm provides a comprehensive and efficient solution for designing, documenting, and generating REST APIs. By leveraging UML class diagrams, developers can visually model their API resources, request/response bodies, and various scenarios, ensuring clarity and consistency throughout the development process.
Key Benefits of Using Visual Paradigm for REST API Development
-
Visual Design: The ability to design REST APIs visually using UML diagrams makes the process more intuitive and accessible, reducing the learning curve for team members and stakeholders.
-
Consistency: By generating code and documentation from a single source of truth (the UML model), Visual Paradigm ensures consistency between design, implementation, and documentation.
-
Documentation Generation: Automatic generation of comprehensive API documentation saves significant time and ensures that documentation stays in sync with the actual implementation.
-
Code Generation: Generating sample code for both providers and consumers accelerates development and reduces the potential for errors in implementing the API communication model.
-
Bidirectional Workflow: The ability to export and import XML models facilitates seamless collaboration between service providers and consumers, ensuring both parties work with the same understanding of the API.
-
Multiple Scenarios Support: The capability to model multiple response scenarios with different status codes enables comprehensive API design that covers various use cases and error conditions.
Best Practices for REST API Design with Visual Paradigm
-
Use Nouns for URIs: When designing URIs, use nouns to represent resources rather than verbs for actions.
-
Define Clear Descriptions: Provide clear descriptions for your resources, parameters, and examples to ensure consumers understand how to use your API.
-
Model All Scenarios: Include both success and error response scenarios to provide a complete picture of your API’s behavior.
-
Provide Examples: Always provide request and response examples to illustrate the expected payload structure.
-
Generate and Review Documentation: Always generate and review the API documentation to ensure it accurately represents your design.
-
Use Sample Code: Leverage the generated sample code as a starting point for your implementation rather than starting from scratch.
Future Considerations
As the software development landscape continues to evolve, tools like Visual Paradigm that support visual modeling and code generation will become increasingly valuable. They enable teams to:
-
Maintain consistency across large teams and complex systems
-
Reduce development time through automation
-
Improve quality by eliminating manual translation errors
-
Enhance collaboration between different stakeholders
By adopting Visual Paradigm for REST API design and generation, organizations can streamline their API development process, deliver higher quality APIs, and provide better experiences for API consumers.
References
-
Overview of REST API: An overview of REST API concepts and Visual Paradigm’s support for REST API generation
-
Modeling REST API with UML: Detailed guide on designing REST API using UML class diagrams in Visual Paradigm
-
How to Design REST API with UML: Practical steps for designing REST APIs with UML diagrams
-
How to Generate REST API from UML: Step-by-step instructions for generating REST API code from UML models
-
How to Use the Generated REST API: Guide for consumers on using the generated REST API code
-
Visual Paradigm Tutorials: Collection of tutorials for getting started with Visual Paradigm
-
Visual Paradigm YouTube Channel: Video resources and demonstrations
-
Visual Paradigm Know-How: Knowledge base with tips, tricks, and solutions
-
Visual Paradigm Support: Support and contact information