


Unified Modeling Language (UML) provides a standardized way to visualize the design of a system. While standard diagrams like Class Diagrams define structure, they sometimes lack the flexibility needed for specific domains. This is where the Profile Diagram becomes essential. It allows you to extend the metamodel without altering the core language. This guide explores how to leverage Profile Diagrams to enhance class structure modeling effectively.
Understanding the Purpose of Profile Diagrams 🤔
Standard UML Class Diagrams are powerful, yet generic. They describe attributes, operations, and relationships in a general sense. However, industries like finance, healthcare, or embedded systems often require specific semantics. A Profile Diagram enables you to define these custom semantics. It does not replace the Class Diagram but augments it.
- Extensibility: Profiles allow you to add new concepts to the UML vocabulary.
- Domain Specificity: They tailor the language to specific business or technical contexts.
- Standardization: They ensure that custom extensions are consistent across the entire project.
When modeling class structures, profiles define how classes should be interpreted within your specific environment. For example, a class might represent a database table, a Java bean, or a microservice. A profile diagram defines these distinctions formally.
Core Concepts of UML Profiles 🧩
To utilize profile diagrams correctly, one must understand the underlying mechanisms of UML extension. The standard UML metamodel serves as the foundation. Profiles extend this foundation using specific mechanisms.
1. The Metamodel Foundation
The UML metamodel defines the rules for all UML diagrams. A Profile Diagram interacts with this metamodel to introduce new elements. It does not change the metamodel itself but creates a layer on top of it.
2. Extension Points
Extension points are specific locations in the metamodel where you can attach new information. For class structures, these points often include:
- Class: The base element you are extending.
- Association: Relationships between classes.
- Package: Organizational units.
3. Stereotypes
A stereotype is the primary mechanism for extension. It is a way to classify a UML element with a specific meaning. When applied to a class, a stereotype indicates that the class belongs to a particular category defined by your profile.
Step-by-Step Construction of a Profile 🛠️
Building a profile involves several logical steps. You define the profile, specify its extension points, add stereotypes, and then apply constraints.
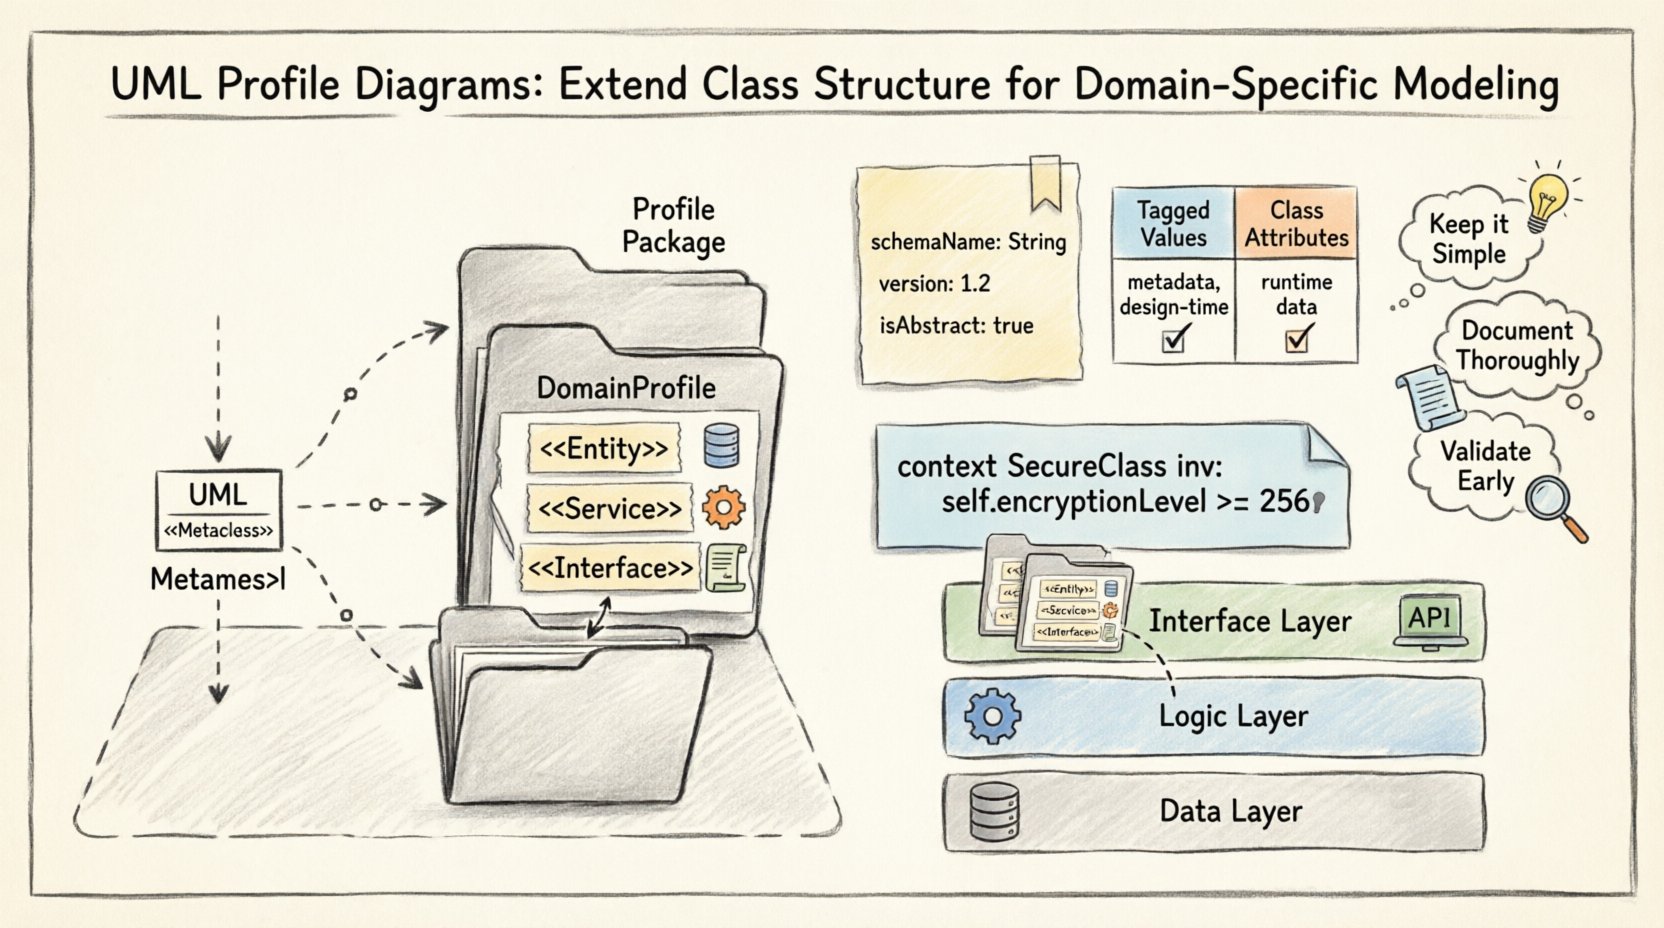
Step 1: Create the Profile Package
Start by creating a dedicated package. This package acts as the container for your profile definitions. It should be separate from the standard UML namespace.
- Label the package clearly, such as DomainProfile.
- Ensure it is marked as a profile stereotype if your tool supports it.
Step 2: Define Extension Points
Identify which elements of the standard metamodel you wish to extend. If you are focusing on class structures, you will primarily extend the Class metaclass.
- Open the profile definition.
- Select the extend relationship.
- Link your new classifier to the Class element in the UML kernel.
Step 3: Define Stereotypes
Create new stereotypes within the profile. Each stereotype represents a specific type of class in your domain.
- Entity: Represents persistent data storage.
- Service: Represents business logic execution.
- Interface: Represents a contract for interaction.
Step 4: Add Tagged Values
Stereotypes often require additional data. Tagged values allow you to attach key-value pairs to stereotypes. This is distinct from class attributes but serves a similar documentation purpose.
- Define the name of the tagged value (e.g.,
schemaName). - Define the data type (e.g., String, Integer).
- Specify if the value is optional or mandatory.
Applying Profiles to Class Structures 🏷️
Once the profile is defined, it must be applied to the actual class diagrams. This process binds the abstract definitions to concrete elements.
Importing the Profile
Before applying stereotypes, the target model must import the profile package. This makes the stereotypes available in the palette.
- Locate the import dependency setting.
- Select the profile package.
- Verify that the new stereotypes appear in your model palette.
Attaching Stereotypes to Classes
Navigate to the Class Diagram where you want to apply the definitions.
- Select the Class element.
- Apply the relevant stereotype from the profile.
- The class notation will typically change visually to reflect the stereotype (e.g., adding a label).
Setting Tagged Values
With the stereotype applied, you can now populate the tagged values.
- Open the properties or details view of the class.
- Locate the section for Tagged Values.
- Enter the specific data required for that class instance.
Differentiating Tagged Values from Attributes 📝
A common point of confusion lies between Tagged Values and Class Attributes. Understanding the distinction is vital for accurate modeling.
| Feature | Tagged Value | Class Attribute |
|---|---|---|
| Purpose | Metadata about the element | Data held by the instance |
| Scope | Applies to the Class definition | Applies to Class instances |
| Visibility | Hidden in generated code usually | Visible in generated code |
| Example | @databaseTable |
userName |
Attributes represent the state of an object at runtime. Tagged values represent the design intent or configuration of the class itself. Using profiles ensures this distinction remains clear.
Constraints and Logic ⚖️
Profiles are not just about naming conventions. They can enforce rules. Constraints ensure that the class structure adheres to specific logic requirements defined by the profile.
Defining Constraints
Constraints are written using a formal language, often Object Constraint Language (OCL). They can be attached to the stereotype or the extension point.
- Preconditions: Requirements that must be met before a class is used.
- Postconditions: Results guaranteed after an operation.
- Invariants: Rules that must always be true.
Example Constraint Logic
Consider a class marked as Secure. A constraint might require that it always has an encryption attribute.
- Constraint:
context SecureClass inv: self.encryptionLevel >= 256 - This ensures that any class with this stereotype meets security standards.
Organizing Profile Packages 📂
As models grow, profiles can become complex. Proper organization is necessary to maintain readability and manageability.
Layering Profiles
Do not place all stereotypes in a single package. Group them by domain layer.
- Data Layer: Profiles for database entities and repositories.
- Logic Layer: Profiles for services and controllers.
- Interface Layer: Profiles for APIs and gateways.
Versioning
Profiles evolve over time. Maintain version numbers in the package name or properties.
Profile_v1.0Profile_v1.1
This helps track changes and prevents breaking existing models.
Common Issues and Solutions 🛠️
Modelers often encounter challenges when integrating profiles. Here are common issues and their resolutions.
Issue 1: Stereotypes Not Appearing
If the profile is defined but not visible in the target diagram:
- Check the import dependency. The target model must explicitly reference the profile package.
- Ensure the profile package is saved and compiled.
Issue 2: Tagged Values Not Saving
If values disappear after closing the model:
- Verify the data type of the tagged value. Some tools restrict certain types.
- Check if the profile is set to read-only mode.
Issue 3: Constraint Validation Failures
If constraints trigger errors constantly:
- Review the OCL syntax for errors.
- Ensure the context of the constraint matches the class structure.
- Check for circular dependencies in the logic.
Best Practices for Profile Modeling 🌟
To ensure your profiles remain effective and useful, adhere to the following guidelines.
- Keep it Simple: Avoid over-extending the metamodel. Only add what is necessary.
- Document Thoroughly: Every stereotype should have a clear description. Explain its purpose and usage.
- Validate Early: Test the profile on a small subset of classes before applying it globally.
- Consistent Naming: Use a consistent prefix for stereotypes (e.g.,
<<DB>>). - Review Regularly: Profiles drift over time. Periodically review them against current project needs.
The Relationship Between Profiles and Metamodels 🔄
It is important to distinguish between modifying the metamodel and extending it. Profiles extend. They do not modify.
- Modification: Changes the rules of the language itself. This is rare and dangerous.
- Extension: Adds new vocabulary without breaking existing rules. This is the role of a Profile.
By respecting this boundary, you ensure that models remain compatible with standard UML tools and documentation standards.
Integrating with Documentation 📄
Profiles enhance the documentation generated from your models. Tagged values can automatically populate sections of a technical specification.
- API Documentation: Use profiles to mark REST endpoints.
- Database Schema: Use profiles to map classes to tables.
- Security Reports: Use profiles to highlight sensitive data structures.
This integration reduces the manual effort required to maintain separate documentation files.
Final Considerations for Class Modeling 🧐
When you combine a robust Class Diagram with a well-defined Profile, you achieve a high-fidelity model. The Class Diagram provides the structural backbone, while the Profile provides the semantic context.
Remember that tools vary in their support for profiles. Ensure your chosen modeling environment supports the import and application of UML profiles. If it does not, the effort invested in creating the profile may not yield results.
Focus on the value the profile adds to the team’s understanding of the system. If it clarifies the design, it is successful. If it confuses the reader, simplify the stereotypes or remove them.
Summary of Key Takeaways 🎯
- Profile Diagrams extend the UML metamodel for specific domain needs.
- Stereotypes are the primary tool for extending Class structures.
- Tagged values provide metadata distinct from class attributes.
- Constraints enforce logic rules within the profile.
- Proper organization and versioning are critical for long-term maintenance.
- Profiles integrate with documentation to reduce manual work.
By following these guidelines, you can create a modeling environment that is both flexible and precise. The Profile Diagram serves as the bridge between abstract design and concrete implementation requirements.

