Business Process Model and Notation (BPMN) serves as the universal language for describing workflows. Within this framework, the clarity of a process often depends on how well the boundaries are defined. The Start Event and the End Event are the anchors of any process diagram. They mark the beginning and the conclusion of a business activity. Misusing these elements can lead to confusion regarding when a process actually initiates and when it is considered complete.
This guide explores the correct usage of Start and End Events to clarify process triggers. We will examine the semantics of these events, their visual representations, and the specific types available for different scenarios. Proper modeling ensures that stakeholders understand the lifecycle of a process instance without ambiguity.
🌱 The Role of the Start Event
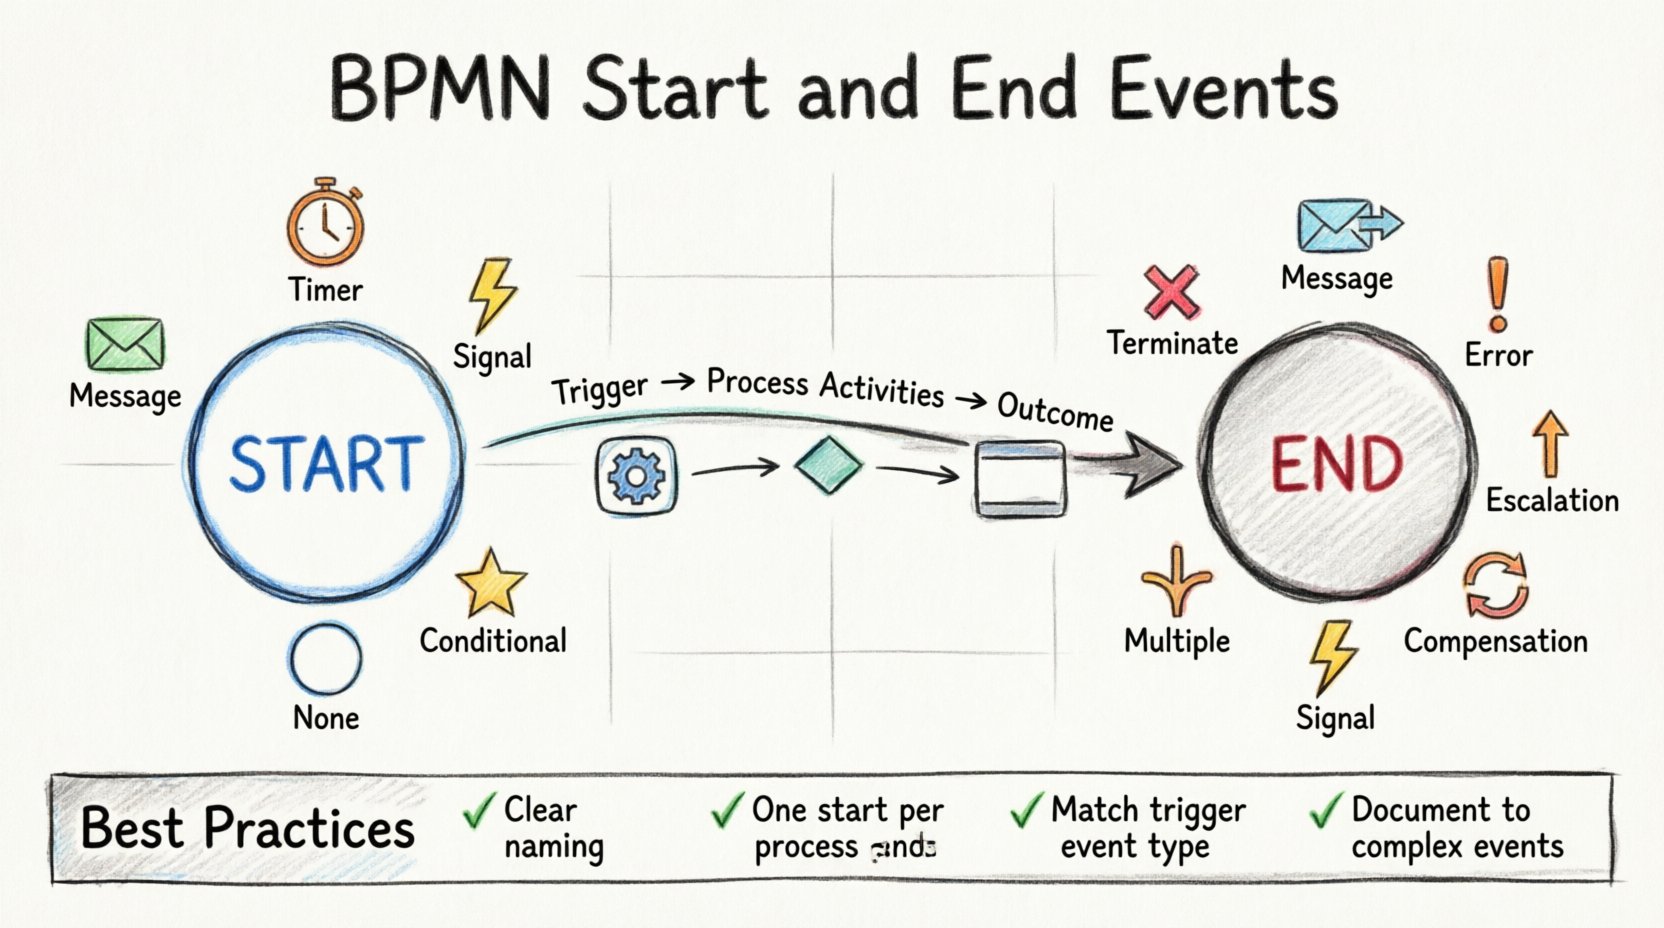
A Start Event represents the point where a process is initiated. It is the trigger that creates a new instance of the process. Visually, this is depicted as a circle with a thin border. The interior is typically white, indicating that nothing happens until the trigger occurs. Unlike a Task, which is an action performed by a participant, a Start Event is a condition that must be met to begin work.
Defining the Trigger
Every Start Event requires a specific trigger. Without a trigger, the process has no way to begin. The type of trigger determines the nature of the process. Here are the common types of Start Events used in BPMN:
None: This is the default type. It implies that the process starts when a human or system manually initiates it without a specific external signal. It is often used for internal processes.
Message: The process begins when a specific message is received from an external participant or system. This is common in B2B interactions or customer service workflows.
Timer: The process starts based on a time schedule. For example, a monthly report might begin automatically on the first day of the month.
Signal: The process is triggered by a signal broadcast to multiple listeners. This allows for multiple processes to start simultaneously in response to a single event.
Conditional: The process begins when a specific condition becomes true. This is less common for the very first event but can be used in specific modeling contexts.
Choosing the correct Start Event type is crucial for clarity. If a process relies on a customer email, using a None Start Event might suggest manual initiation, whereas a Message Start Event accurately reflects the automated receipt of that email.
🛑 The Role of the End Event
Conversely, the End Event marks the termination of a process. It signifies that the business activity has been completed successfully or terminated due to an exception. Visually, this is also a circle, but it has a thick border. The interior is typically white, similar to the Start Event.
Just as a process needs a clear beginning, it needs a clear ending. An ambiguous End Event can leave stakeholders wondering if a task is still pending or if the workflow has finished. The End Event also acts as a terminator for the process instance, releasing resources associated with that instance.
Types of End Events
Different scenarios require different types of End Events. Selecting the right one communicates the outcome of the process clearly:
Terminate: This event ends the process immediately. It is often used to stop a process when a critical condition is met, such as a cancellation request.
Message: The process ends after sending a specific message to an external participant. This confirms that the workflow has completed its communication loop.
Error: This indicates that the process ended due to an error. It is essential for tracking failed processes and understanding why a business activity did not succeed.
Escalation: Used when the process ends because an issue was escalated to a higher management level.
Compensation: This triggers a compensation process if the activity needs to be undone. It is used in long-running transactions.
Signal: Similar to the Start Event, this broadcasts a signal upon completion, allowing other processes to react to the finished state.
Multiple: This allows the process to end in one of several ways, depending on the path taken.
Using a Terminate event is different from a Message event. Terminate stops everything immediately. Message sends a notification before stopping. Understanding this distinction prevents confusion about whether the system is still active.
📊 Comparison of Start and End Event Types
To help visualize the differences, consider the following table comparing the common types of Start and End Events. This structure aids in selecting the appropriate element for your specific business scenario.
Event Type | Visual Indicator | Primary Use Case | Direction |
|---|---|---|---|
Message | Envelope Icon | External Communication | Start & End |
Timer | Clock Icon | Scheduled Execution | Start & End |
Error | Exclamation Icon | Exception Handling | End Only |
Terminate | Red X Icon | Immediate Stop | End Only |
Signal | Lightning Icon | Global Broadcast | Start & End |
None | Blank Circle | Manual Initiation | Start Only |
Notice that some events, like Error and Terminate, are typically End Events. Others, like None, are typically Start Events. Mixing these can lead to modeling errors.
🔍 Clarifying Process Triggers
The term “trigger” refers to the event that causes the process to move forward. In BPMN, the Start Event is the primary trigger. However, triggers can also exist within the process flow, often acting as intermediate events. For the purpose of this guide, we focus on the boundaries.
Correctly identifying the trigger ensures that the process is responsive to business needs. If a process is designed to start only when a payment is received, the Start Event must be a Message Event representing that payment. If it is modeled as a Timer Event, the system might wait for a date, ignoring the payment status entirely.
Common Trigger Scenarios
Customer Inquiry: A process for handling customer complaints should start with a Message Event representing the received email or ticket.
Monthly Reconciliation: A finance process should start with a Timer Event set for the last day of the month.
System Shutdown: A maintenance process might start with a Signal Event broadcast by the infrastructure team.
Manual Onboarding: A hiring process might start with a None Event, waiting for a recruiter to manually click a button to begin.
Each scenario requires a distinct approach to modeling. The Start Event is the contract between the business and the system. It defines the promise of when work begins.
⚠️ Common Modeling Mistakes
Even experienced modelers can make mistakes when defining Start and End Events. These errors can lead to processes that are difficult to execute or monitor. Below are some frequent pitfalls to avoid.
1. Multiple Start Events Without a Gateway
A single process definition should typically have only one Start Event. If you find yourself needing multiple Start Events, consider using a Process Sub-Process or a Gateway. Having two Start Events can confuse the execution engine about which instance to create.
2. Missing End Events
Every path in a process must lead to an End Event. If a path ends at a Task or a Gateway without a termination point, the process instance hangs. It consumes resources without completing. Always ensure every branch connects to an End Event.
3. Using Tasks Instead of Events
Do not use a Task to represent the start of a process. A Task implies work is being done immediately. A Start Event implies a condition is waiting to be met. Using a Task for a trigger can lead to confusion about whether the work is optional or mandatory.
4. Ambiguous End States
Do not use a generic End Event for all outcomes. If a process ends due to a payment failure, use an Error End Event. If it ends due to successful completion, use a Message or None End Event. Distinguishing between success and failure is vital for reporting.
🛠 Best Practices for Clarity
To ensure your process diagrams are clear and effective, follow these best practices when using Start and End Events.
Consistent Naming: Label your events clearly. Instead of just “Start”, use “Start: Order Received”. Instead of “End”, use “End: Order Shipped”. This provides context without needing additional text.
Visual Hierarchy: Ensure the Start Event is at the top left and the End Event is at the bottom right. This follows the natural reading direction and reduces cognitive load.
Boundary Checking: Regularly review your diagrams to ensure no paths are orphaned. Every sequence flow must eventually reach an End Event.
Scope Definition: Clearly define what the process instance covers. If the process involves multiple departments, ensure the Start Event reflects the entry point for the entire organization, not just one department.
Documentation: Add documentation notes to complex Start and End Events. Explain the specific trigger conditions in the notes section if the icon alone is not sufficient.
🔗 Sub-Processes and Event Handling
When modeling complex systems, you will often encounter Sub-Processes. These are processes contained within another process. The Start and End Events of a Sub-Process are critical for defining the interaction between the parent and the child.
Embedded Sub-Processes
In an embedded Sub-Process, the Start Event is hidden within the boundary. The parent process does not see the internal Start Event. It simply sees the entry into the Sub-Process. This is useful for hiding complexity.
Event Sub-Processes
Event Sub-Processes allow a process to react to an event while the main process is running. These have their own Start Event inside the boundary. They are triggered independently of the main flow. This is a powerful feature for handling interruptions without stopping the main workflow.
When using Event Sub-Processes, ensure the Start Event is clearly labeled. It should indicate what event triggers the sub-process. For example, “Error Handler: Start on Timeout”.
⚙️ Error Handling and End Events
Error handling is a critical aspect of process modeling. When a process encounters an error, it needs to know how to respond. The End Event plays a role here, but Intermediate Events are often used for catching errors.
However, the final End Event must reflect the outcome. If a process fails and is not recovered, it should end with an Error End Event. This signals to the monitoring system that the process instance is in a failed state.
Compensation Flow
In long-running processes, you may need to undo work. If a process is terminated early, you might need to trigger a compensation process. This is often linked to a Compensation End Event. This ensures that financial or data integrity is maintained even if the process stops prematurely.
🔄 Lifecycle and State Management
Understanding the lifecycle of a process instance is key to managing Start and End Events. The lifecycle begins the moment the Start Event is triggered. It ends when the End Event is reached.
Creation: The Start Event creates the instance.
Execution: Tasks and Gateways are executed.
Termination: The End Event closes the instance.
If a process does not reach an End Event, it remains in a running state. This consumes system memory and database space. Regular auditing of processes can help identify instances that are stuck and need manual intervention.
📝 Final Considerations
Modeling Start and End Events is not just about drawing circles. It is about defining the logic of your business. These events act as the interface between the human world and the digital workflow. When used correctly, they provide clarity on when work starts and when it finishes.
By avoiding common mistakes and adhering to best practices, you can create diagrams that are easy to understand and execute. Remember to choose the right event type for your specific trigger. Use the thick border for termination and the thin border for initiation. Ensure every path leads to a clear conclusion.
The goal of BPMN is communication. Clear Start and End Events facilitate better communication between stakeholders, developers, and business users. They reduce ambiguity and ensure that everyone has the same understanding of the process boundaries.
Take the time to review your diagrams. Ask yourself if the Start Event truly reflects the business trigger. Ask if the End Event accurately reflects the business outcome. Small adjustments to these elements can significantly improve the quality of your process models.
