“Learn visual modeling with AI—no prior experience required.”
Welcome! 👋 If you’re new to Visual Paradigm, AI-powered diagramming, or even just feeling overwhelmed by where to start—you’re in the right place.
This step-by-step beginner’s tutorial will walk you through Visual Paradigm’s four AI pillars, from your very first prompt to building a complete, traceable project. No jargon, no assumptions—just clear, actionable guidance.
Let’s begin your journey! 🚀
📋 What You’ll Learn
By the end of this tutorial, you will be able to:
✅ Understand the 4 AI pillars of Visual Paradigm and when to use each
✅ Create your first AI-generated diagram using natural language
✅ Document your work collaboratively in OpenDocs
✅ Follow guided modeling workflows in Web App Studios
✅ Export and refine models in VP Desktop for professional delivery
✅ Connect all four tools into a seamless end-to-end workflow
Time to complete: ~2 hours (with hands-on practice)
Skill level: Absolute beginner
Prerequisites: A computer, internet connection, and curiosity!
🔧 Before You Start: Setup Checklist
✅ Step 1: Create Your Free Account
-
Click “Sign Up” (top right)
-
Choose Free Tier (includes access to Chatbot, OpenDocs, and limited Web Apps)
-
Verify your email and log in
💡 Tip: Bookmark your dashboard—you’ll return here often!
✅ Step 2: Install VP Desktop (Optional for Now)
You can skip this for Parts 1-3 and come back later.
-
From your dashboard, go to Downloads → VP Desktop
-
Choose your OS (Windows/macOS/Linux)
-
Install and launch the application
-
Log in with the same account to sync your work
✅ Step 3: Familiarize Yourself with the Interface
Take 5 minutes to explore:
-
Dashboard: Your hub for all tools
-
AI Chatbot: Chat interface for diagram generation
-
OpenDocs: Document editor with live diagrams
-
Web Apps: Collection of guided modeling studios
-
VP Desktop: Professional modeling application (if installed)
🎯 Beginner Goal: Don’t memorize everything. Just get comfortable clicking around.
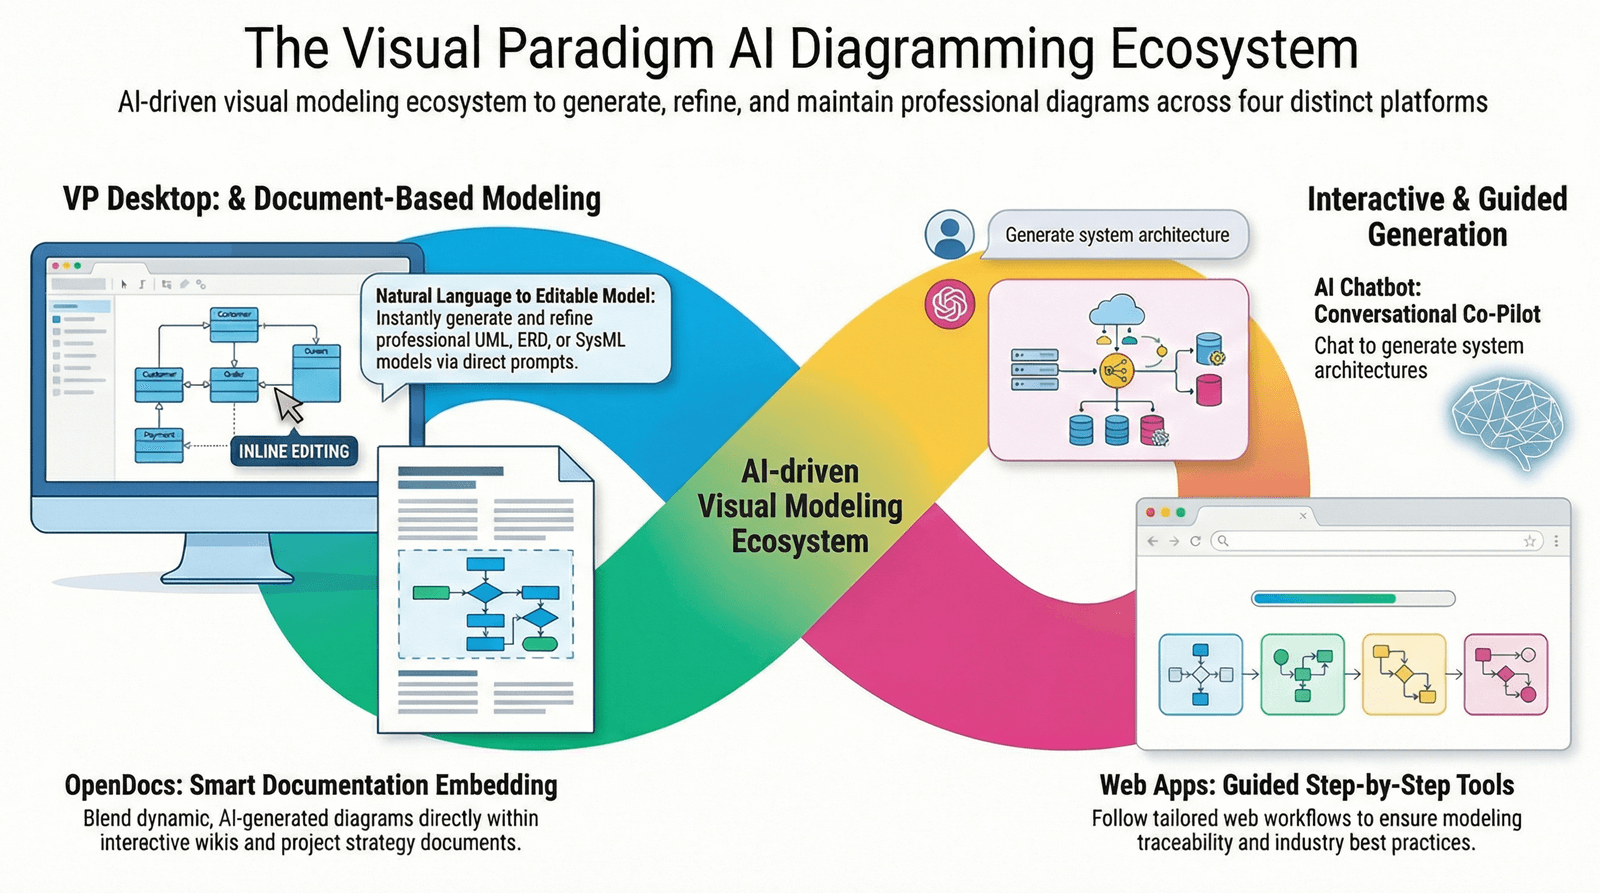
🌱 Part 1: Your First AI Diagram (Using the Chatbot)
Why start here? The AI Chatbot has the gentlest learning curve—you type, it draws. Perfect for building confidence.
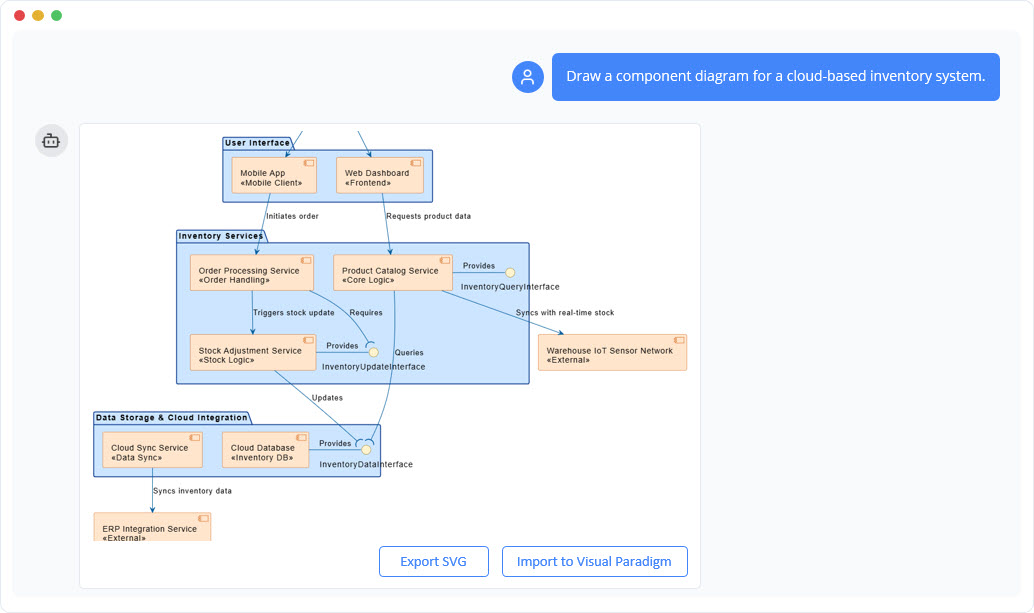
🎯 Exercise: Create a Simple User Login Flow
Step 1: Open the AI Chatbot
-
From your dashboard, click “AI Chatbot” or go to https://chat.visual-paradigm.com
-
You’ll see a chat interface—just like messaging a friend
Step 2: Write Your First Prompt
Type this exactly (or copy-paste):
Create a sequence diagram for a user logging into a web application. Include: user, login page, authentication service, and database. Show successful login and failed login paths.
Step 3: Review & Refine
-
The AI will generate a diagram in ~10 seconds
-
Look at the result. Does it match what you imagined?
-
Try refining with a follow-up prompt:
Add a step for two-factor authentication after password verification
Step 4: Save or Export
-
Click “Export” → Choose OpenDocs (to continue documenting) or VP Desktop (to refine professionally)
-
Or click “Copy Link” to share with a teammate
✅ You just did AI-powered modeling! 🎉
🔍 What Happened Behind the Scenes?
-
The AI parsed your natural language
-
Identified key actors (user, services) and actions (login, verify)
-
Applied UML sequence diagram rules automatically
-
Generated editable, standards-compliant output
🛠️ Try This Next (Practice Prompts)
1. "Draw a mind map for planning a mobile app launch"
2. "Create a use case diagram for an online bookstore"
3. "Show a flowchart for processing a customer refund"
💡 Pro Tip for Beginners: Start simple. Add complexity gradually. The AI learns from your iterations!
📝 Part 2: Documenting with OpenDocs (Living Knowledge)
Why OpenDocs? It turns static diagrams into collaborative, evolving documentation—perfect for team projects.
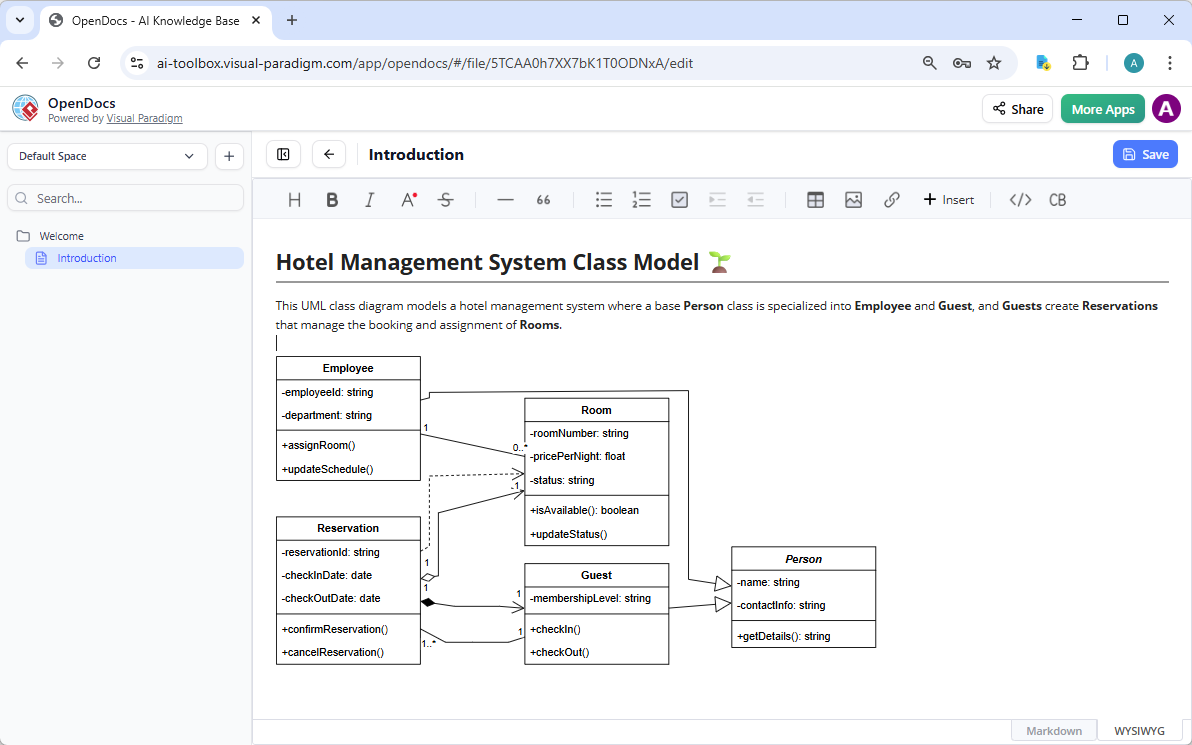
🎯 Exercise: Build a Living Requirements Doc
Step 1: Create a New OpenDoc
-
From dashboard → OpenDocs → “New Document”
-
Title it: “User Authentication Feature Spec”
-
Choose a template (or start blank)
Step 2: Insert Your Chatbot Diagram
-
In the editor, type
/diagramand press Enter -
Select “Import from AI Chatbot”
-
Choose the login flow diagram you created earlier
-
The diagram appears—and it’s live!
Step 3: Add Context & Collaborate
-
Type above the diagram: “This flow handles user login with optional 2FA”
-
Highlight the diagram → Click “Comment” → Add: “Should we add rate limiting here?”
-
Share the doc link with a teammate (or open in another tab to simulate collaboration)
Step 4: Edit the Diagram Inline
-
Click the diagram → “Edit”
-
Drag to rearrange steps, or right-click an element → “Edit Properties”
-
Change “Authentication Service” to “Auth Microservice”
-
Notice: The diagram updates instantly—no re-exporting needed!
✅ You now have living documentation! 📚✨
🔍 Why This Matters for Beginners
-
No more “Which version is current?” confusion
-
Diagrams stay synchronized with text explanations
-
Team feedback happens in context—not in separate threads
🛠️ Try This Next
1. Add a "Security Considerations" section below your diagram
2. Use AI: Highlight text → "Generate a threat model diagram"
3. Export the doc as PDF for stakeholder review
🧭 Part 3: Guided Modeling with Web App Studios
Why Web Apps? They provide step-by-step guidance—ideal when you need structure or follow a methodology.

🎯 Exercise: Build a C4 Architecture Model (Beginner-Friendly)
Step 1: Open the C4 PlantUML Studio
-
Dashboard → Web Apps → “C4 PlantUML Studio”
-
Click “Start New Project”
Step 2: Follow the Guided Steps
The studio will walk you through:
Step A: Define System Context
-
Prompt: “What is the name of your system?” → Type: “UserAuth Platform”
-
Prompt: “Who are the primary users?” → Add: “End Users, Admins, Third-Party Apps”
-
AI suggests: “Consider adding ‘Security Auditor’ as a secondary actor” → Click “Add”
Step B: Identify Containers
-
Prompt: “What major components make up your system?”
-
Type: “Web Frontend, API Gateway, Auth Service, User Database”
-
AI auto-generates connections between them
Step C: Refine Components
-
Select “Auth Service” → Click “Drill Down”
-
Add internal components: “Login Handler, Token Validator, 2FA Manager”
Step 3: Review & Export
-
Click “Preview” to see your full C4 model
-
Use “Validate” to check for common architecture anti-patterns
-
Export to: OpenDocs (for documentation) or VP Desktop (for engineering)
✅ You just created a professional-grade architecture model—with guidance! 🏗️
🔍 What Makes Studios Beginner-Friendly?
-
No blank-canvas anxiety: Each step has clear prompts
-
Best practices baked in: AI suggests improvements you might miss
-
Methodology compliance: Ensures your model follows C4, ArchiMate, or other standards
🛠️ Try This Next
1. Explore the "Use Case Modeling Studio" for requirements work
2. Try the "AI Cloud Architecture Studio" for AWS/Azure diagrams
3. Use the "Decision Table Generator" for business rule documentation
⚙️ Part 4: Professional Refinement with VP Desktop
Why VP Desktop? When you need precision, code generation, or enterprise-grade traceability.
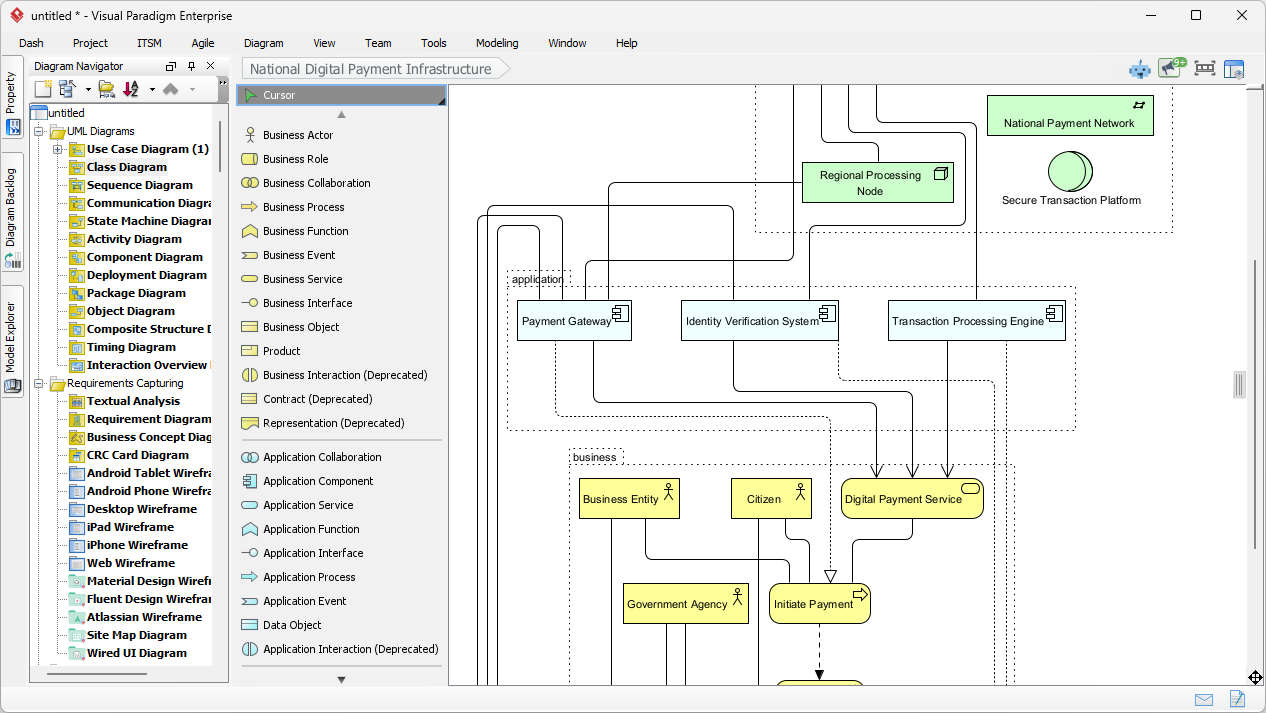
🎯 Exercise: Import & Enhance Your Model
Step 1: Open Your Project in VP Desktop
-
Launch VP Desktop
-
Click “File” → “Import” → “From OpenDocs” (or Chatbot/Web App)
-
Select your UserAuth project
Step 2: Explore the Professional Toolset
Take a moment to notice:
-
Model Explorer (left panel): Hierarchical view of all diagrams
-
Properties Panel (right): Detailed settings for any selected element
-
Toolbar: Specialized tools for relationships, notes, constraints
Step 3: Add Professional Details
-
Select the “Auth Service” class
-
In Properties Panel → “Operations” tab → Click “+”
-
Add:
+ validateToken(token: String): Boolean -
Right-click the class → “Generate Code” → “Java”
-
Review the generated stub—notice how your model translates to real code!
Step 4: Create Traceability
-
Open your “Login Requirement” use case
-
Drag a “Realize” relationship to the “Auth Service” class
-
Now you can trace: Requirement → Design → Code
✅ Your model is now engineering-ready! 💻
🔍 Why This Step Matters
-
Code generation saves hours of manual typing
-
Traceability ensures changes propagate correctly
-
Version control integration (Git/SVN) supports team collaboration
🛠️ Try This Next
1. Generate Python code instead of Java
2. Add a "Performance Constraint" note to the database component
3. Use "Model Validation" to check for incomplete relationships
🔗 Part 5: Connecting It All—Your End-to-End Workflow
Now that you’ve tried each pillar, let’s see how they work together in a real beginner project.
🎯 Mini-Project: Plan a “Forgot Password” Feature
Phase 1: Ideate (AI Chatbot)
Prompt: "Create a sequence diagram for a user requesting a password reset email"
Refine: "Add token expiry and click tracking"
Export to: OpenDocs
Phase 2: Document (OpenDocs)
-
Create doc: “Password Reset Feature Spec”
-
Embed the sequence diagram
-
Add sections: “Security Requirements”, “Error Handling”, “Analytics”
-
Share with teammate for comments
Phase 3: Architect (Web App Studio)
-
Open “Use Case Modeling Studio”
-
Build use cases: “Request Reset”, “Verify Token”, “Set New Password”
-
Link to your OpenDocs spec for context
Phase 4: Engineer (VP Desktop)
-
Import the use case model
-
Generate class diagrams for the reset service
-
Create database schema hints for the tokens table
-
Export traceability report for QA team
Phase 5: Maintain (OpenDocs + VP Desktop Sync)
-
As the feature evolves, update diagrams in OpenDocs
-
Sync changes to VP Desktop for code updates
-
Keep stakeholders informed via the living doc
🎯 Result: A complete, traceable feature—from idea to implementation.
🔄 Visual Workflow Map
[Chatbot] → Ideation & Prototyping
     ↓
[OpenDocs] → Documentation & Collaboration
     ↓
[Web Apps] → Structured Modeling & Compliance
     ↓
[VP Desktop] → Engineering & Delivery
     ↻
[Sync Back] → Living docs stay current
🚫 Common Beginner Mistakes (And How to Avoid Them)
❌ Mistake 1: Trying to Learn Everything at Once
Fix: Master one pillar first (start with Chatbot), then expand.
❌ Mistake 2: Overly Complex First Prompts
Fix: Start simple: “Draw a flowchart for X” → Refine iteratively.
❌ Mistake 3: Treating AI Output as Final
Fix: Always review, refine, and validate. AI assists—you decide.
❌ Mistake 4: Ignoring Export Options
Fix: Use exports strategically: Chatbot→OpenDocs for docs, Chatbot→VP Desktop for engineering.
❌ Mistake 5: Not Using Templates
Fix: Leverage built-in templates in OpenDocs and Web Apps to accelerate learning.
💡 Golden Rule for Beginners: Progress > Perfection. Ship a simple model today; refine it tomorrow.
🆘 Troubleshooting Quick Guide
| Issue | Likely Cause | Quick Fix |
|---|---|---|
| AI generates wrong diagram type | Vague prompt | Be specific: “Create a [diagram type] for [purpose]” |
| Can’t find export button | Using free tier | Some exports require upgrade—check plan details |
| Diagram won’t edit in OpenDocs | Imported as image | Use “Import from AI” not “Upload Image” |
| VP Desktop feels overwhelming | Too many features | Focus on one diagram type; hide unused panels |
| Collaboration not syncing | Browser cache | Hard refresh (Ctrl+F5) or clear cache |
🆘 Still stuck? Visit Visual Paradigm Help Center or use in-app chat support.
📚 Next Steps: Continue Your Learning Journey
🎯 Beginner Practice Projects
-
Personal: Map your morning routine as an activity diagram
-
Professional: Document a current project’s user flow
-
Learning: Recreate a diagram from a tutorial, then modify it
📖 Recommended Learning Path
Week 1: Master AI Chatbot prompts (15 mins/day)
Week 2: Build 3 OpenDocs with embedded diagrams
Week 3: Complete one guided Web App Studio project
Week 4: Import a model to VP Desktop and generate code
🚀 When You’re Ready to Level Up
-
Explore advanced AI features: “Explain this diagram”, “Suggest improvements”
-
Integrate with Jira, Confluence, or GitHub
-
Join Visual Paradigm certification programs
🎉 Congratulations! You’ve Completed the Beginner’s Tutorial
You now have:
✅ A foundational understanding of Visual Paradigm’s AI ecosystem
✅ Hands-on experience creating diagrams with natural language
✅ Skills to document, collaborate, and engineer with AI assistance
✅ A clear path to continue growing your visual modeling expertise
🌟 Remember: Every expert was once a beginner. Keep practicing, stay curious, and don’t hesitate to experiment. The best way to learn visual modeling is by doing.
🔄 Your Action Plan for This Week
-
Today: Create one diagram using the AI Chatbot
-
Tomorrow: Document it in OpenDocs and share with one person
-
This Week: Try one Web App Studio for structured practice
-
Next Week: Explore VP Desktop for professional refinement
💬 We’d love to hear from you: What was your “aha!” moment? Share your first diagram on social media with #VPAIBeginner—we might feature it!
🔗 References (Beginner-Friendly Resources)
- VP Desktop – AI-Powered Professional Modeling: The flagship desktop application for engineering-grade modeling, code generation, and traceability—ideal for final project delivery [[35]].
- AI Visual Modeling Chatbot: Conversational AI assistant that generates diagrams from natural language prompts—perfect for beginners starting their visual modeling journey [[30]].
- OpenDocs – AI-Powered Knowledge Platform: Collaborative documentation tool with live, editable diagrams embedded directly in text—great for team projects and living specs [[22]].
- Visual Paradigm AI Ecosystem Overview: Third-party guide explaining how the four AI pillars integrate for end-to-end visual modeling workflows [[7]].
- Ultimate Guide to Visual Paradigm AI: Comprehensive tutorial with beginner tips, workflow examples, and pro techniques for each platform [[4]].
- AI Diagram Generator Comparison: Reference matrix showing which diagram types are supported across all four Visual Paradigm AI tools [[3]].
- AI Chatbot Feature: Official documentation for the conversational AI assistant, including prompt examples and export options [[31]].
- OpenDocs Documentation: User guide for setting up collaborative workspaces, managing permissions, and embedding live diagrams [[23]].
- VP Desktop AI Features: Step-by-step guide to enabling and using AI-powered tools within the desktop application [[11]].
- C4 PlantUML Studio: Guided web studio for building traceable software architecture models using the beginner-friendly C4 methodology [[39]].
- AI Cloud Architecture Studio: Tutorial for generating AWS, Azure, and GCP architecture diagrams from simple text descriptions [[2]].
- Use Case Modeling Studio: Web-based tool that guides beginners through requirements analysis and use case diagram creation [[38]].
- OpenDocs AI Diagram Generation: Release notes highlighting new AI capabilities for generating UML diagrams directly within OpenDocs [[27]].
- Visual Paradigm AI Updates: Latest feature updates including cross-platform diagram importing and AI activity diagram generation [[19]].
